Thursday, November 21, 2013

Christmas wreaths - the edible kind!


Photo by: Little Birdie Secrets

There are plenty of stories about how the Christmas wreath tradition started.

But what I love is how one thing stands out so clearly in all the different stories - the wreath is an unwavering symbol of hope and light.

Now that is Christmas beauty.

Some wreaths have candles that are lit in the weeks leading up, with the final candle bursting to light on Christmas day.

Just lovely.

Now there are all sorts of wreaths.
Pine, fir cones, paper, garlands, fabric, twigs, twine, laurel leaves, gold, silver, blue, green, red...

So many awesome manifestations.
> Red is Christmas!
* Rich, red velvet cake
* Never too much red with Elmo
* Baked with love

I worked on my lemony version for Christmas, cuz I like edible wreaths best!
> What's baking this Christmas?

The recipe I used was from one of the happy COOKIE
books (it's literally titled 'Cookies'!) I have on my bookshelf,
which makes it a little hard to transport to share here.
But Martha Stewart has an amazing version, check out her recipe here.

Another recipe for Christmas: Sugar Cookies - perfect for festive icing!

Start by rolling out little lengths of dough ropes. Take 2 ropes,
twist them together like you're braiding hair. Circle the braided
ropes to form a wreath, tucking the ends together where they meet.

The dough softens when it's been out of the fridge for a while,
just pop them back in to firm up if it gets too soft to handle.

When they're slightly browned, they're ready to be taken out.
The final baked wreath is still fairly pale in color, so don't get alarmed. 

As it bakes, the braids expand so remember to
leave a little space in the center for the dough to fill out.

After cooling, the braids are ready to be glazed (see recipe for Lemon Glaze).
While the glaze is still wet, add your sprinkles and decor to make them
Christmassy. I added little fondant angels and stars to mine here,
great variation that's quick to make and keeps well.

Bag the little rounds of Christmas spirit in clear
pouches so they can peek out and say hi, and you're all set!

Friday, November 8, 2013

The most wonderful time of the year!


It's officially Christmas season! 

I'm not crazy (yet)... 

I know it's only November, but if you've been to town, you'd have seen the first Christmas lights strung up along Orchard. Yes I did realise they're not lit yet, but honestly guys, we gotta make the most of the MOST WONDERFUL TIME OF THE YEAR!

What we lack in wintery celebration, we make up for in Christmas decadence... especially the desserty sort. 

Time to start making that list, checking it twice (there's still time to be nice!), and making sure you don't miss spreading the cheer. 
> click on our Christmas Bake List picture above for bigger pop-up

We can't wait for Christmas!

Tuesday, November 5, 2013

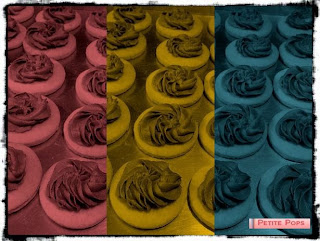
Ombre swirl cookies


I've always loved colors.
Instant perk-me-ups.

         More of our colorful bakes: 
         > Minion cuteness!
         > The very hungry caterpillar
         > A purple green birthday
         > How do you wink at an orange?

Add to that, the power of ombre.
Life can be so sweet ;)

When I came across I Am Baker's Rainbow Rose Cookies, I knew I'd found my vehicle for ombre goodness.

So I adapted her rainbow colors for swathes of pink, the little pretty swirls on each cookie peeking just above, showing off their graduated hues.

         Pink's one of our most popular dessert colors!
        > A fairy tale wedding
        > Sugar & spice!
        > Sweet strawberries
        > Bunnies at the zoo


Love colors!
Have I mentioned that already?

Started off baking up a big batch of the sugar cookies, here's the recipe I adapted from I Am Baker:
                 ===========================================================

SUGAR COOKIES
(makes about 48 cookies)

Ingredients
224g butter
300g sugar
2 large eggs
2 egg yolks
4 tspns vanilla extract
2 tspns almost extract
600g flour
1 tspn salt
1 tspn baking powder

Instructions
- In a mixer, beat butter and sugar until well combined, about 2min
- Add in the eggs and egg yolks, mix until combined
- Add in vanilla and almond extract, mix until combined
- In a separate bowl, sift together flour, salt and baking powder. Slowly (about 1 cup at a time) add the flour to butter mixture and combine. You can use a mixer or not, just depends on how strong you are. Don't over mix the dough, it will get tough.
- Put dough in clingfilm and refrigerate for at least 1 hour
- When ready to bake, heat over to 180 degres Celsius. Roll dough out, cut out cookies and bake for 12min.
===========================================================

I'd adjusted mainly the butter and sugar amounts and the baking time to suit my oven, I prefer my cookies less sweet and not too buttery. For I Am Baker's original recipe, click here.

This is a pretty sturdy cookie recipe, great for storing and handling.

Just make sure you cut them fairly thick so they don't break apart so easily when decorating. They also keep well and you can make them in advance, freeze them and pop them out when you need some.


You can make the cookie frosting out of buttercream, much like how you would top a cupcake - just a thicker consistency so they'll hold their shape.

I made mine out of royal icing as they had to stay out quite a while for a mom who ordered them for her daughter's Teacher's Day gifts, and royal holds up much better in our heat and humidity.


I experimented with colors and tips - this was a Wilton 2E:


And decided I liked the open-tip #827 better:


Another obsession of mine - washi tape, a serious contender for a girl's best tool. 

Don't forget to whip them out when you need to dress up a plain box or kraft bag, they can take a million shapes and forms. 
> Check out our cute cupcake bags

What I did forget, was to take a photo of the boxes I decorated with washi tape before I gave them out, so shall have to settle for the next best thing: a picture of the tape I used instead!


Have fun experimenting with ombres and washi!