Showing posts with label smile. Show all posts

Monday, March 11, 2013

Petite Pops goes to the zoo... dinosaur ROARRR!

Happy Birthday OLPT!

ROARRR!!! Is that the sound dinos make?

I hope so.

Cuz that's going onto the cake I'm making.

More on Petite Pops' animal adventures:

Just back from Japan - rejuvenated, missing the crazy fubuki and superb food terribly, but all ready to work on my OLPT's birthday cake *rub hands in glee*.
> OLPT = Official Little Pops Tester (it's a good job ;)

His Mommy's throwing a dino party this year, and we thought it'd be fun to work in a couple of cake pops into the chocolate cake (seriously... what's a birthday without cake pops?!).

Trees - that's what I'll use the red velvet cake pops for.
Set up a nice jungle backdrop for the dino story.

This is from my baking inspiration, Bakerella - she is THE cake pop goddess! The recipe uses boxed cake mix, I use cakes baked from scratch which work just as well. 

It also features canned frosting, which is a fantastic binder. I'm not such a fan so I use jams, buttercreams, ganache - anything that binds will work. Oh, but no chunks. Those get in the way when rolling into cake shapes.

Ok, back to the dino cake.

What's next?

I mulled over the design for a couple of days and started putting the pieces together:


It looks like a jumble now, but it'll all come together, you'll see!

The cake is taking shape... 

Thin crumb coat of banana buttercream before
the fondant goes on ... or as the Cake Boss would say, "durrrty-ice it!"

Keeping the colors fairly cheery, OLPT is after all only 6.
And my fave detail: the bones!

This little fella found his way into the dino scene. Couldn't help it,
got hold of the cutest little porcupine cutter in Japan and had to use it.

ROAR!!! Finishing touch of dino eggs,
cake pop trees and we're all set.

Happy Birthday Aaron, to many years of Official Pops Testing ahead!

Wednesday, November 7, 2012

Petite Pops goes to the zoo... Hop right in!


A brand new entry for our Zoo series, and today we're hoppin' right' in!

More Zoo stories:

Meet Tooth and Friends, bringing the power of pink and a grand grin to the birthday girl :)

Now this birthday girl is not your regular 'child' category, but that's the beauty of cake pops. Never too young or too old, always space in your heart for pops that make your day dance.

Taking inspiration from my baking idol Bakerella's bunnies, I set about creating my own little bunny colony.

Start by shaping the bunny heads into giant tear drop shapes. You won't get these perfectly symmetrical to the next, but just like real live pets - that's why each is distinct and special, so embrace them.

Getting your shapes right - part of the battle won.
Getting your colors right - you can almost start celebrating.

Use light/similar colored cake bases for pale colors
like pink so they don't show up underneath
Don't be scared off by the strong colors candy melts come in.
I kinda like this hot fuschia actually, it's just not very rabbit-y...
Mix and color up or down till you get the right shade
- takes patience, a good eye and lotsa luv
Ta-da just right!
I had these pretty flower marshmallows tinged in yellow, pink and blue - perfect for ears. Cut them up and each petal became a perky bunny ear.


You gotta have imagination when making cake pops. Visualise pieces and parts in unusual ways. 

Oh yes, 'think outta the box' applies to bakers too ;) Add heart sprinkles for noses, white confetti for eyes, pipe on the eyes, lashes and mouth - we're good to go.


 And when you get it right, cake pops are just the best thing to bring on a big, bright birthday smile!

Monday, August 13, 2012

10 years young - the cake (Part 2)

The kids had their share of fun at the pool, now it was time for Gabby's family to get some!

Gabby wasn't tired of my chocolate yet, so here's the plan: top her 10 years with even more chocolate - a big ol' fudgy chocolate cake! 

If I could make her a chocolate hot tub to swim in, I would. She loves chocolate ... you might have figured that out by now.
> Another themed birthday cake: Hole in one, anybody?

Ok, so when her mom ordered the cake for 10 pax,  she mentioned Gabby would love some extras to eat over the next few days. I might... just possibly... have taken the 'extras' just a little overboard... 

You can't tell from this innocuous photo, but this is actually a 4+kg cake!

A few days before assembling the cake, I started on the centerpiece - the lime green ribbon that made this a 'present cake'. 

The loops were individually cut and shaped into giant teardrops, dried and hardened, and the center strip mint green applied.


The loops have to be fairly thick, about 1/8 inch, to hold their shape

Side view: Debossed texture added to each loop for richer look 

Then I started layering the loops and building the ribbon, usually 2-3 tiers, capped with a final loop towards the center. The weight of the loops all bear down on the bottom tier, so you have to work gingerly and lightly so the loops don't start cracking. 

Make sure you give plenty of time for all this because it's gonna to take a while for the drying to kick in, and give you a sturdy, pretty ribbon. 
> Rose Bakes has a good tutorial on how to make a fondant bow

Now we're ready - time to build us some cake!

Smother the cake in fudgy chocolate, it's a big cake so don't be cheap on the chocolate, we don't want any part tasting dry and leathery.

Bubble, bubble, toil and trouble... how all yummy fudges start

Keeping elements from the poolside cupcakes,
the 'gift tag' for cake was shaped like a sun

Shades of cloudy blue, also from the pool cupcakes

Top off with the bow - viola, done! 

Gabby's mum:" Gabby loves the cake. And oh, by the way - your cake could feed a small village!"

Mission accomplished.

Wednesday, August 1, 2012

10 years young - that's a whole decade! (Part 1)


Happy decade, Gabby!

10 years is a big deal. It's a whole decade, you gotta give it respect. 

Respect spelled OTT-c-h-o-c-o-l-a-t-e.

That was the reigning flavor in Gab's 10-year birthday celebrations. She loves chocolate, and the oozy gooey goodness is really the only fitting flavor to mark a decade.

We start off in the kitchen, mixing up a batch of chocolate cupcakes with chocolate chips. 

My pink mixing spoon somehow managed to sneak into shot...

You won't see these choc chips after they're baked in, but they're well worth adding - they make the cupcakes extra rich and chocolately.

Before hitting the oven: See how ooey, gooey they are?

Oh, there was a pool theme too, since it was a poolside party. 
I wanted something fun and cheery for the kids, since these cupcakes were going to be the take-home bags.


Sunshine!

I started forming little sunbursts, stacking the yellow centers atop each lick of poppin' orange. 

I love the buck-toothed ones best!

Then the little faces went on. Eyes and mouths do wonders in upping the cute factor. 
Not all though... I've done some failed ones that looked more like maniacs and malformed witches, I shall spare you the horrors. 

Next: swim rings.

These look deceptively simple, but man oh man, did I see stars cutting each color ring out.

It's hard to tell the scale from here - let me assure you - cutting and picking up many half cm pieces does something to your fingers, and your mind. By the time I fixed all the pieces on, I felt confident I could perform surgery on ants.

Warning: these swim rings will NOT save you in a storm,
unless your waist is the size of a polo sweet

Sun and Swim Rings meet cupcakes!

Bagged, tagged and ready to go!
It made my day when the birthday girl told her mom," Look at the details, even the length of ribbons are matching!"

More on Gabby's birthday cake next week, stay tuned!

Thursday, July 19, 2012

Tanjoubi Omedetou, a Rilakkuma birthday


I have my friend Z to thank, for introducing me to the world of Rilakkuma.


She’s mad about all things Jap + cute, and Rilakkuma ranks high up there in her top 10. Naturally, my first exposure to the little bear was through Z, she just about went nuts when we went to Japan – Rila heaven.

When the request came for Rilakkuma cake pops for a little 6-year-old's birthday, I knew exactly what she wanted, and I already had visions of how they would look.

Thank God for Z and her fanatical loves.

Rilakkuma (left) means' bear in relaxed mood',
perfect for this cheeky lil lazy bear!

> More on other well-loved characters: There's never too much red around with Elmo, Curious George (or rather his look-alike!)

As always, work started with the add-ons to the pops beforehand, what I call ‘fun & frills’ – the most fun parts about pops, but also the most painstaking.

Hmmm, colours...

Rilakkuma is a malty brown, so I started mixing up tawny fondant for his ears, and added tiny yellow insides, each ear barely half a cm small.

Make your 'fun & frill' parts beforehand so they
get to dry enough to stand on their own on the pops 

No bear should ever have to be alone, so I brought his pal Korilakkuma along.


This cheeky fellow - his name means 'small Rilakkuma' - is a creamy pale yellow, and I gave him tiny pink insides for ears.


I drew on teeny mouths with an edible black marker (I find these markers work well only with fondant, they're pretty much hopeless on any other material!). 

All set, let the dipping begin.


The 'fun & frill' parts are holding up well, yay!

Wait, something’s missing…. 
It’s a birthday, so we had to have some party hats! I shaped cone hats out of fondant, added confetti dots, and set the hats on a few lucky bears. 

Ready to party

Wait wait... something's still missing.
It aian't no party without Kiiroitori! For the uninitiated, this yellow duck-bird completes the Rila trio, and I just had to throw in a special Kiiroitori surprise for the birthday girl.

My fave - Kiiroirtori

Tanjoubi omedetou or 'happy birthday to you', my little Rilakkuma fan.


Monday, May 14, 2012

Petite Pops goes to the zoo ... Canines go upscale!


So dogs don't exactly belong in a zoo, but you get the idea...

After chicken rice, 4D, bubble tea and soccer - dogs are probably next on the list of Singaporeans' favourite things.

This was done for a birthday celebration - 59 glorious years of life and living!

The birthday mommy loved dogs, and we decided we just had to make her some doggie pops.

I'm not sure what breed my doggie pops fall under (did I just create a new breed??) ... so let's call them Floppy Ears.

Floppy ears!
Shaped with teardrop cutters.

Read about Petite Pops' other zoo escapades ... Ponies and Monkeys.

Since they were going to be a delicious chocolately brown base, I made Floppy Ears out of a spongy chocolate cake. The tan coating went perfectly with the cocoa-coloured cake inside, never too much chocolate!

Check out other chocolate pops at the golf course)

On went the tiny chocolate button noses. And then the marshmellow collars, the floopy ears. After I piped their little eyes and doggie noses, they were complete.

Almost.

I decided to accessorize.

Gave one a little multi-layered hat, another couple had 2 green pigtail hair-ties.

Green's quite a good look for Floppy Ears?


A few more had their purple starburst hats tilted at an angle.

Not quite Kate Middleton :)


Special surprise touch...  chocolate chip  birthday cupcakes!


Done.

One day, I'll attempt to make pops that look like my dogs.


Monday, February 13, 2012

My poster boy

He's mine, my little poster boy. He makes first contact with my pops.

Ok... more like my OLPT - Official Little Pop Tester.


OLPT's private moment with his pop

He was introduced to my first ever cupcake pops when he went to his aunt's house for the family's weekly dinner; his aunt is a good friend of mine. When he saw them, he picked one up, looked hard and asked," What's that?"

My first attempts weren't the prettiest. I was foolish enough to start with cupcake pops... they looked so adorable in the book, I dove right in.

What was I thinking??
I wasn't - apparently.

I had to get the cake baked, and then frost-mixed. It spent some time chilling in the fridge before I could shape them into tiny cupcakes. Of course, my cake was too moist - it was my first. And it was a pain in the ass to shape cake that wouldn't hold, and will that soggy mess to stay on the stick.


Virgin pops - they tasted better than they looked, honest!

To add to the fun, it was a 2-step shaping process. Which meant extra handling of the cake, which led to the inevitable - my cake got even softer.

All too much for a first timer.

I felt exactly as I did when I climbed Mount Rinjani in Lombok, all 3000m of it - madly exhausted, half crazed.

But my OLPT was such a dear, he lapped it up.
And even asked for seconds.

I experiment with designs on weekends, there're just so many ways you could work a pop.
Swirls, dips, sprinkles, buttons, confetti, piping, tri-coating, pearl dusted ... endless.


 And every Sunday, OLPT looks forward to the pops.

He's never afraid to try, he never rejects. Sometimes he'll say 'it's yummy!' (his fave phrase for pops). Other times when the designs are bad, even he has to ask again," What's that?"

Kids never lie (not yet at this age, at least) - and that's the best part about my OLPT.

It's his birthday next week, I'm psyched to be doing his birthday pops!


Thursday, January 12, 2012

Stars on trees.. it's Christmas!


My favourite time of the year - Christmas!

It's usually quite a lovely, busy time with church, friends, family. Eating, catching up, spending time, connecting with those we love.

There's also a great deal of excitement tearing open lovingly-wrapped parcels, some oddly shaped, holding mystery cheer ... and sometimes getting strange gifts you have no idea what to do with.

No matter, good intentions were there, Christmas cheer all round.

This is a back-tracked post as you can tell, Christmas 2011.

I took on a bit more than I could chew, with quite a few Christmas pop orders. Drove me a little nuts, I got really, really ill by the time Christmas came round. But I guess no better way than to dive right in, and paddle like there's no tomorrow.

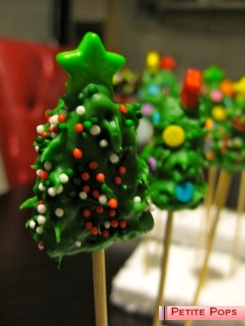
These Christmas trees are one of my favourit-est and most popular pops, I had such fun doing them (aside from the horrendous fever and flu I caught from the lack of rest, ugh).


I started off with small confetti stars atop the trees, but somehow they just didn't have that special oomph I wanted.

I shopped around, trawled sweet sections in malls, and found the perfect stars you see here - from Candilicious!

I had an army of trees invading the house, they were everywhere. Tables, on top of the stoves, in the ovens, on the shelves. I didn't see my table top for a good 2 weeks.


Nekkid pops!

It was quite a bit of effort bagging, tagging, ribboning each of these little trees, but I do so love how they look in the end.
Realms of luscious Christmas colours!

 
The trees... sharing a moment...


Love the tiny green trees against the rich chocolate brown!

These little babies were quicker to do. I found these adorable green trees at the baking shop a little while ago, and was waiting for the right pop to use them on. 

And I found a home for them here. 

In case you're wondering... the Christmas trees took a lot more time to do, and would cost a little more than simpler round pops with the trees like these. 

There are always options, occasions, who you want the pops for, for the budget you have in mind. So don't be shy... always feel free to drop me a note if you'd like to bounce ideas for a certain pop you have in mind, or even if it's to ask - how much would a Christmas Tree pop cost?

Merry Christmas!